이 게시물을 통해 JWT 및 Spring Boot를 사용하여 기본 사용자 인증을 구현하는 방법을 배우겠지만 먼저 JWT가 무엇인지 알아야 합니다. 빠른 Google 검색을 수행하면 JWT가 RFC 7519 공개 표준임을 알 수 있습니다.
JWT(JSON Web Token)는 두 당사자 간에 전송할 클레임을 나타내는 압축된 URL 안전 수단입니다. JWT의 클레임은 JSON 웹 서명(JWS) 구조의 페이로드 또는 JSON 웹 암호화(JWE) 구조의 일반 텍스트로 사용되는 JSON 객체로 인코딩되어 클레임을 디지털 서명하거나 무결성 보호할 수 있습니다. 메시지 인증 코드(MAC) 및/또는 암호화.
이러한 종류의 정의는 때로 실제보다 복잡해 보일 수 있으므로 더 쉽게 설명하겠습니다. 개인 정보가 있거나 액세스가 제한된 모든 애플리케이션에서는 모든 요청에 대해 클라이언트의 로그인 자격 증명을 처리하지 않고 요청을 검증하는 방법이 필요합니다. 이를 위해 쿠키나 로그인 정보 없이 사용자를 인증하는 JWT가 있습니다.
설명
사용자가 로그인하면 백엔드는 다음과 같이 구성된 JWT를 생성합니다.
header.payload.signatureHEADER
JWT가 토큰이 해석되어야 하는 방법에 대한 모든 관련 정보를 포함하는 헤더로 시작한다는 것을 알 수 있습니다.
PAYLOAD
페이로드에는 클레임이 포함됩니다. 간단히 말해서 클레임은 사용자의 데이터(또는 모든 엔터티)와 토큰에 기능을 추가하는 추가 중요한 정보(필수 아님)입니다.
등록, 공개, 비공개의 세 가지 유형의 클레임을 찾을 수 있습니다.
등록된 클레임은 토큰이 생성된 시간 또는 토큰이 만료된 시간과 같은 토큰에 대한 추가 정보를 제공하는 데 사용됩니다. 이러한 주장은 필수 사항이 아닙니다.
공개 클레임은 JWT를 사용하는 사람들이 정의합니다. 충돌을 일으킬 수 있으므로 사용하는 이름에 주의해야 합니다.
비공개 클레임은 등록된 클레임 또는 공개 클레임을 사용하지 않고 정보를 저장하는 데 사용할 수 있습니다. 충돌하기 쉬우므로 주의하십시오.
SIGNATURE
서명은 인코딩된 헤더, 인코딩된 페이로드, 비밀 및 코딩 알고리즘(헤더에도 있음)으로 구성됩니다. 그리고 서명된 모든 것입니다.
구현
구현을 위해 Java Spring Boot를 사용하여 로그인이 있는 작은 응용 프로그램을 만들고 postman를 사용하여 해당 응용 프로그램을 사용합니다. 지속성과 관련하여 우리는 PostgreSQL을 사용할 것이지만 어떤 종류의 관계 없이 사용자를 유지한다는 점을 명심하십시오(목표는 기본 세션 로그인을 가르치는 것이기 때문에 역할과 같은 다른 엔터티를 사용하면 주요 개념에서 벗어나게 됩니다. ).
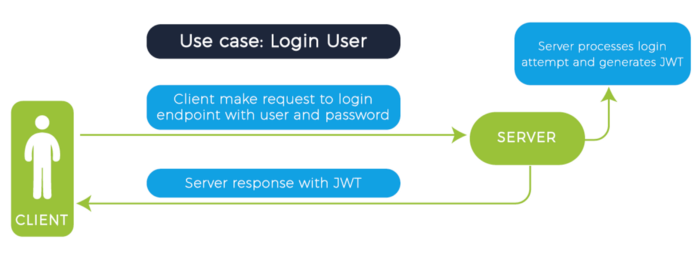
시작하기 위해 사용 사례를 사용자가 로그인할 때와 사용자가 보호된 엔드포인트를 사용하려고 할 때 두 가지로 나누어 보겠습니다.

이 다이어그램에서 사용자가 사용자 이름과 비밀번호로 로그인을 시도하고 요청이 성공하고 그 대가로 사용자가 보호된 엔드포인트를 사용하는 데 사용할 JWT를 수신하는 것을 볼 수 있습니다.

이 다이어그램에서 로그인하고 JWT 토큰을 얻은 후 사용자가 보호된 끝점에 요청하고 서버가 해당 JWT를 확인하고 요청을 처리하고 클라이언트에 응답을 보내는 것을 볼 수 있습니다.
이제 클라이언트-서버 상호 작용 방식에 대한 아이디어를 얻었으므로 프로젝트 구조를 살펴볼 수 있습니다.

package com.woloxJwt.woloxJwt.models;


import javax.persistence.Entity;
import javax.persistence.GeneratedValue;
import javax.persistence.GenerationType;
import javax.persistence.Id;


@Entity
public class ApplicationUser {
    @Id
    @GeneratedValue(strategy = GenerationType.IDENTITY)
    private long id;
    private String username;
    private String password;

    public long getId() {
        return id;
    }

    public void setId(long id) {
        this.id = id;
    }

    public String getUsername() {
        return username;
    }

    public void setUsername(String username) {
        this.username = username;
    }

    public String getPassword() {
        return password;
    }

    public void setPassword(String password) {
        this.password = password;
    }
}
여기에 우리 애플리케이션의 일반적인 User 클래스가 있습니다. 앞서 언급한 것처럼 주요 개념에서 벗어나지 않기 위해 역할 구현을 생략했습니다.
이 경우 데이터베이스의 사용자를 나타내는 ID가 있고 사용자의 자격 증명을 유지하고 로그인 프로세스에서 사용할 수 있는 사용자 이름과 암호가 있습니다.
package com.woloxJwt.woloxJwt.repositories;

import com.woloxJwt.woloxJwt.models.ApplicationUser;
import org.springframework.data.jpa.repository.JpaRepository;

public interface ApplicationUserRepository extends JpaRepository<ApplicationUser, Long> {
    ApplicationUser findByUsername(String username);
}
사용자를 유지하기 위해 저장소를 사용합니다. 이 저장소에는 인증 프로세스에 유용한 사용자 이름으로 사용자를 얻을 수 있는 방법이 있습니다.
package com.woloxJwt.woloxJwt.controllers;

import com.woloxJwt.woloxJwt.models.ApplicationUser;
import com.woloxJwt.woloxJwt.repositories.ApplicationUserRepository;
import org.springframework.security.crypto.bcrypt.BCryptPasswordEncoder;
import org.springframework.web.bind.annotation.*;

@RestController
@RequestMapping("/users")
public class UserController {

    private ApplicationUserRepository applicationUserRepository;
    private BCryptPasswordEncoder bCryptPasswordEncoder;

    public UserController(ApplicationUserRepository applicationUserRepository,
                          BCryptPasswordEncoder bCryptPasswordEncoder) {
        this.applicationUserRepository = applicationUserRepository;
        this.bCryptPasswordEncoder = bCryptPasswordEncoder;
    }

    @PostMapping("/record")
    public void signUp(@RequestBody ApplicationUser user) {
        user.setPassword(bCryptPasswordEncoder.encode(user.getPassword()));
        applicationUserRepository.save(user);
    }
}
이 컨트롤러는 사용자 이름과 암호를 사용하여 데이터베이스에 사용자를 등록하는 역할을 합니다. 데이터베이스에 실제 비밀번호 정보가 포함되지 않도록 비밀번호를 암호화하고 있다는 점에 유의하는 것이 중요합니다.
package com.woloxJwt.woloxJwt.controllers;

import org.springframework.http.HttpStatus;
import org.springframework.http.ResponseEntity;
import org.springframework.web.bind.annotation.GetMapping;
import org.springframework.web.bind.annotation.RequestMapping;
import org.springframework.web.bind.annotation.RestController;

@RestController
@RequestMapping("/api/secure")
public class SecuredController {

    @GetMapping
    public ResponseEntity reachSecureEndpoint() {

        return new ResponseEntity("If your are reading this you reached a secure endpoint", HttpStatus.OK);
    }
}
이것은 인증이 성공했는지 테스트하고 올바른 JWT 없이는 일반적으로 액세스할 수 없는 응답을 받는지 테스트하는 보안 컨트롤러가 됩니다.
Spring Boot 보안 구성 및 필터
package com.woloxJwt.woloxJwt.constants;

public class SecurityConstants {
    public static final String SIGN_UP_URL = "/users/record";
    public static final String KEY = "q3t6w9z$C&F)J@NcQfTjWnZr4u7x!A%D*G-KaPdSgUkXp2s5v8y/B?E(H+MbQeTh";
    public static final String HEADER_NAME = "Authorization";
    public static final Long EXPIRATION_TIME = 1000L*60*30;
}
여기에서 일련의 중요한 데이터를 볼 수 있습니다.
SIGN_UP_URL: 사용자를 등록할 공용 엔드포인트를 결정합니다.
KEY: 토큰에 서명하기 위한 키가 포함되어 있으며 길이가 512바이트 이상입니다. 이는 최소한 해당 길이의 문자열이 필요한 알고리즘에서 사용되기 때문입니다. (일반적으로 키는 비밀에서 얻어지며 결코 하드코딩되지 않습니다).
HEADER_NAME: 요청을 수행할 때 JWT를 추가할 헤더의 이름을 포함합니다.
EXPIRATION_DATE: 토큰이 만료되기 전에 유효한 시간(밀리초)을 포함합니다.
package com.woloxJwt.woloxJwt.configuration;

import com.woloxJwt.woloxJwt.security.AuthenticationFilter;
import com.woloxJwt.woloxJwt.security.AuthorizationFilter;
import com.woloxJwt.woloxJwt.services.ApplicationUserDetailsService;
import org.springframework.context.annotation.Bean;
import org.springframework.http.HttpMethod;
import org.springframework.security.config.annotation.authentication.builders.AuthenticationManagerBuilder;
import org.springframework.security.config.annotation.web.builders.HttpSecurity;
import org.springframework.security.config.annotation.web.configuration.EnableWebSecurity;
import org.springframework.security.config.annotation.web.configuration.WebSecurityConfigurerAdapter;
import org.springframework.security.config.http.SessionCreationPolicy;
import org.springframework.security.crypto.bcrypt.BCryptPasswordEncoder;
import org.springframework.web.cors.CorsConfiguration;
import org.springframework.web.cors.CorsConfigurationSource;
import org.springframework.web.cors.UrlBasedCorsConfigurationSource;

import static com.woloxJwt.woloxJwt.constants.SecurityConstants.SIGN_UP_URL;

@EnableWebSecurity
public class SecurityConfiguration extends WebSecurityConfigurerAdapter {

    private ApplicationUserDetailsService userDetailsService;
    private BCryptPasswordEncoder bCryptPasswordEncoder;

    public SecurityConfiguration(ApplicationUserDetailsService userDetailsService, BCryptPasswordEncoder bCryptPasswordEncoder) {
        this.userDetailsService = userDetailsService;
        this.bCryptPasswordEncoder = bCryptPasswordEncoder;
    }

    @Override
    protected void configure(HttpSecurity http) throws Exception {
        http.cors().and().csrf().disable().authorizeRequests()
                .antMatchers(HttpMethod.POST, SIGN_UP_URL).permitAll()
                .anyRequest().authenticated()
                .and()
                .addFilter(new AuthenticationFilter(authenticationManager()))
                .addFilter(new AuthorizationFilter(authenticationManager()))
                .sessionManagement().sessionCreationPolicy(SessionCreationPolicy.STATELESS);
    }
    @Bean
    CorsConfigurationSource corsConfigurationSource() {
        final UrlBasedCorsConfigurationSource source = new UrlBasedCorsConfigurationSource();
        source.registerCorsConfiguration("/**", new CorsConfiguration().applyPermitDefaultValues());
        return source;
    }

    @Override
    public void configure(AuthenticationManagerBuilder auth) throws Exception {
        auth.userDetailsService(userDetailsService).passwordEncoder(bCryptPasswordEncoder);
    }


}
이 클래스에는 Spring Boot 보안 구성이 포함되어 있습니다. 이 구성을 사용하면 사용자를 등록할 수 있는 URL, 보호되는 URL 및 인증에 사용할 세션 유형을 지정할 수 있습니다.
이 클래스가 수행하는 가장 중요한 구성을 살펴보겠습니다.
가장 먼저 관찰할 수 있는 것은 @EnableWebSecurity 주석입니다. 이 주석은 구성을 변경할 Spring Boot에 통합된 웹 보안을 활성화합니다.
SecurityConstants 클래스에서 정의한 상수 SIGN_UP_URL을 기억하십니까? 이 상수는 이 클래스의 configure(HttpSecurity http) 메서드에서 사용자를 등록할 수 있는 엔드포인트 을 정의하는 데 사용됩니다. 또한 이 메서드는 CORS 구성, 인증 정의 및 인증 필터(그 구현은 나중에 볼 수 있음)와 세션을 상태 비저장(세션을 처리하기 위한 응답과 함께 쿠키를 보내는 것을 방지함)을 설정합니다. corsConfigurationSource() 메서드에서 모든 URL이 엔드포인트 CORS를 지원하도록 허용하고 이를 통해 일부만 또는 전혀 제한하지 않도록 할 수 있습니다.
마지막으로 configure(AuthenticationManagerBuilder 인증) 메서드를 사용하면 인증이 올바르면 사용자 데이터를 얻기 위해 서비스의 사용자 정의 구현을 사용할 수 있습니다(다음에 이 서비스 구현을 볼 것입니다).
package com.woloxJwt.woloxJwt.services;

import com.woloxJwt.woloxJwt.models.ApplicationUser;
import com.woloxJwt.woloxJwt.repositories.ApplicationUserRepository;
import org.springframework.security.core.userdetails.User;
import org.springframework.security.core.userdetails.UserDetails;
import org.springframework.security.core.userdetails.UserDetailsService;
import org.springframework.security.core.userdetails.UsernameNotFoundException;
import org.springframework.stereotype.Service;

import static java.util.Collections.emptyList;

@Service
public class ApplicationUserDetailsService implements UserDetailsService {
    private ApplicationUserRepository applicationUserRepository;

    public ApplicationUserDetailsService(ApplicationUserRepository applicationUserRepository) {
        this.applicationUserRepository = applicationUserRepository;
    }

    @Override
    public UserDetails loadUserByUsername(String username) throws UsernameNotFoundException {
        ApplicationUser applicationUser = applicationUserRepository.findByUsername(username);
        if (applicationUser == null) {
            throw new UsernameNotFoundException(username);
        }
        return new User(applicationUser.getUsername(), applicationUser.getPassword(), emptyList());
    }
}
이 서비스는 데이터베이스의 사용자 데이터를 제출된 자격 증명과 비교하고 일치하는 경우 사용자를 인증하는 역할을 합니다. 메서드가 사용자 세션을 생성하기 위해 Spring Boot 보안의 핵심에서 사용하는 User 객체를 인스턴스화한다는 점을 강조하는 것이 중요합니다.
이제 데이터베이스에서 사용자 데이터를 가져오는 데 필요한 서비스와 JWT 토큰을 생성하는 Spring Boot에 필요한 구성이 있으므로 두 가지 매우 중요한 클래스를 볼 수 있습니다. 첫 번째 클래스는 사용자 인증을 담당합니다( 로그인이 정확할 때 헤더에 전송되는 토큰 생성) 및 두 번째 토큰은 클라이언트가 전송한 토큰의 유효성을 검사하여 클라이언트가 보호된 끝점을 사용할 수 있도록 합니다.
package com.woloxJwt.woloxJwt.security;

import com.fasterxml.jackson.databind.ObjectMapper;
import com.woloxJwt.woloxJwt.models.ApplicationUser;
import io.jsonwebtoken.Claims;
import io.jsonwebtoken.Jwts;
import io.jsonwebtoken.SignatureAlgorithm;
import io.jsonwebtoken.security.Keys;
import org.springframework.security.authentication.AuthenticationManager;
import org.springframework.security.authentication.UsernamePasswordAuthenticationToken;
import org.springframework.security.core.Authentication;
import org.springframework.security.core.AuthenticationException;
import org.springframework.security.core.userdetails.User;
import org.springframework.security.web.authentication.UsernamePasswordAuthenticationFilter;

import javax.servlet.FilterChain;
import javax.servlet.ServletException;
import javax.servlet.http.HttpServletRequest;
import javax.servlet.http.HttpServletResponse;
import java.io.IOException;
import java.security.Key;
import java.util.ArrayList;
import java.util.Date;

import static com.woloxJwt.woloxJwt.constants.SecurityConstants.*;

public class AuthenticationFilter extends UsernamePasswordAuthenticationFilter {
    private AuthenticationManager authenticationManager;

    public AuthenticationFilter(AuthenticationManager authenticationManager) {
        this.authenticationManager = authenticationManager;
    }

    @Override
    public Authentication attemptAuthentication(HttpServletRequest req,
                                                HttpServletResponse res) throws AuthenticationException {
        try {
            ApplicationUser applicationUser = new ObjectMapper().readValue(req.getInputStream(), ApplicationUser.class);

            return authenticationManager.authenticate(
                    new UsernamePasswordAuthenticationToken(applicationUser.getUsername(),
                            applicationUser.getPassword(), new ArrayList<>())
            );
        } catch (IOException e) {
            throw new RuntimeException(e);
        }
    }

    @Override
    protected void successfulAuthentication(HttpServletRequest req, HttpServletResponse res, FilterChain chain,
                                            Authentication auth) throws IOException, ServletException {

        Date exp = new Date(System.currentTimeMillis() + EXPIRATION_TIME);
        Key key = Keys.hmacShaKeyFor(KEY.getBytes());
        Claims claims = Jwts.claims().setSubject(((User) auth.getPrincipal()).getUsername());
        String token = Jwts.builder().setClaims(claims).signWith(key, SignatureAlgorithm.HS512).setExpiration(exp).compact();
        res.addHeader("token", token);


    }
}
이 클래스에서 가장 먼저 알 수 있는 것은 사용자 세션 처리를 담당하는 클래스인 "UsernamePasswordAuthenticationFilter"에서 확장된다는 것입니다. 클래스를 통해 세션 시작 시도를 처리하기 위해 "attemptAuthentication" 메서드에서 사용할 "AuthenticationManager" 클래스의 개체를 인스턴스화한다는 것을 알 수 있습니다. 시도가 만족스러운 경우 "successfulAuthentication" 메소드에서 토큰이 생성됩니다. 먼저 만료 시간을 정의한 다음(이전에 정의된 상수 중 하나를 사용함) 토큰에 서명할 키를 생성합니다. 이 키는 상수에도 정의되어 있습니다. "hmacShaKeyFor" 메서드를 사용하여 이 키를 안전한 방식으로 생성합니다(이전에는 리터럴 문자열이 사용되었지만 이를 위해 Key 개체를 사용하는 것이 더 안전함). 키는 특정 크기여야 한다는 점에 유의하는 것이 중요합니다. 예를 들어 암호화 알고리즘 "HS512"를 사용할 것입니다. 이 알고리즘의 경우 512비트 이상의 문자열이 필요합니다. 그렇지 않으면 이것이 충분히 안전하지 않다는 예외가 발생합니다.
사용자 인증을 담당하는 클래스를 보았으므로 이제 보호된 엔드포인트를 사용하도록 사용자에게 권한을 부여하는 클래스를 살펴보겠습니다. 이를 위해 이 클래스는 클라이언트가 우리에게 보내는 토큰의 유효성을 검사하고 서명과 일치하는지 확인합니다.
package com.woloxJwt.woloxJwt.security;

import io.jsonwebtoken.Claims;
import io.jsonwebtoken.Jwts;
import io.jsonwebtoken.security.Keys;
import org.springframework.security.authentication.AuthenticationManager;
import org.springframework.security.authentication.UsernamePasswordAuthenticationToken;
import org.springframework.security.core.context.SecurityContextHolder;
import org.springframework.security.web.authentication.www.BasicAuthenticationFilter;

import javax.servlet.FilterChain;
import javax.servlet.ServletException;
import javax.servlet.http.HttpServletRequest;
import javax.servlet.http.HttpServletResponse;

import java.io.IOException;
import java.security.Key;
import java.util.ArrayList;

import static com.woloxJwt.woloxJwt.constants.SecurityConstants.*;

public class AuthorizationFilter extends BasicAuthenticationFilter {

    public AuthorizationFilter(AuthenticationManager authManager) {
        super(authManager);
    }

    @Override
    protected void doFilterInternal(HttpServletRequest request,
                                    HttpServletResponse response,
                                    FilterChain chain) throws IOException, ServletException {
        String header = request.getHeader(HEADER_NAME);

        if (header == null) {
            chain.doFilter(request, response);
            return;
        }

        UsernamePasswordAuthenticationToken authentication = authenticate(request);

        SecurityContextHolder.getContext().setAuthentication(authentication);
        chain.doFilter(request, response);
    }

    private UsernamePasswordAuthenticationToken authenticate(HttpServletRequest request) {
        String token = request.getHeader(HEADER_NAME);
        if (token != null) {
            Claims user = Jwts.parser()
                    .setSigningKey(Keys.hmacShaKeyFor(KEY.getBytes()))
                    .parseClaimsJws(token)
                    .getBody();

            if (user != null) {
                return new UsernamePasswordAuthenticationToken(user, null, new ArrayList<>());
            }else{
                return  null;
            }

        }
        return null;
    }
}
이 클래스에서 "authentication" 메소드가 토큰이 존재하는지, 존재한다면 유효한지 여부를 확인하는 것을 볼 수 있습니다. 이 경우 토큰에서 암호화된 사용자를 가져와 "SecurityContextHolder"에 통합한 다음 일련의 필터(일부는 "SecurityConfiguration" 클래스에서 정의)를 실행합니다. 필터가 올바르게 통과하면 메서드를 통해 사용자가 엔드포인트에 도달할 수 있습니다.
지금까지는 사용자가 로그인할 엔드포인트을 구체적으로 정의하지 않았습니다. 이것이 "UsernamePasswordAuthenticationFilter" 인증 필터를 확장할 때 Spring Boot가 이미 엔드포인트을 미리 정의한 이유입니다. 이 시점에서 사용자를 로그인하고 보호된 엔드포인트의 사용을 승인하는 데 필요한 모든 논리를 이미 구현했습니다.
구현 테스트
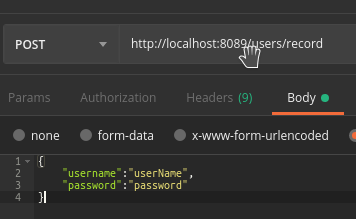
구현을 테스트하기 위해 Postman을 사용할 것입니다. 먼저 사용자를 등록해야 합니다. 이를 위해 사용자가 POST에서 갖게 될 자격 증명을 보내고 데이터베이스에 유지됩니다.

모든 것이 잘 되었다면 자격 증명이 유지되었음을 확인하는 HTTP 상태 200을 받게 됩니다. 이제 로그인을 시도할 수 있습니다.

"http://localhost:8089/login"에 대한 요청을 할 것입니다. 자격 증명이 정확하면 HTTP 상태 200 응답과 헤더에 포함된 서버에서 생성한 토큰을 받게 됩니다.

이제 신원을 확인하는 토큰이 있으므로 보안 엔드포인트를 사용할 수 있습니다. 이전에 정의한 엔드포인트에 액세스해 보겠습니다. 이번에는 GET 메서드를 사용하여 "http://localhost:8089/api/secure"로 요청을 보내지만 헤더에 토큰을 추가해야 합니다. 이를 위해 "Authorization"이라는 단어를 식별자로, 그 옆에 토큰을 넣을 것입니다.
토큰이 정확하면 보호된 정보를 읽고 있다는 확인과 함께 200 응답 상태에 응답합니다.

이 엔드포인트를 사용함으로써 애플리케이션에서 사용자의 인증 및 권한 부여가 작동하는지 확인할 수 있습니다.
결론
이 게시물에서 우리는 자격 증명, 사용자가 로그인할 수 있는 엔드포인트를 정의하는 컨트롤러 및 사용자가 승인된 경우에만 사용할 수 있는 끝점을 사용하여 기본 사용자 클래스를 구현했습니다. 이를 위해 Spring Boot의 보안을 구성하고 일련의 필터를 구현하고 각 요청에서 보내는 토큰을 생성하는 논리를 개발했습니다.
이 모든 작업을 수행한 후 JWT를 사용하여 정보가 안전하게 유지된다는 확신을 가질 수 있습니다.